Possibly Educational

Family History for the Finisher

This is a series on finding your niche in doing family history.

If you’re married, chances are your spouse’s family won’t automatically appear on your tree in FamilySearch. This isn’t really a big deal, but if you’re a finisher you’ll probably want to have it in there anyway. You know, just in case. Adding a spouse’s tree isn’t very intuitive, so here’s a quick tutorial.

Public v private tree

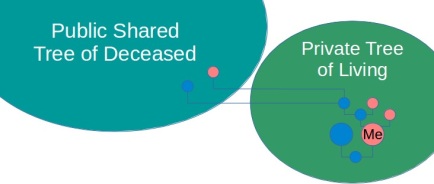
To begin with, you need to understand how both the public and private spheres of FamilySearch work. The public part of FamilySearch is only the deceased, and it’s shared by everyone–anyone can contribute to and edit this big tree. The living people in your tree are private, and only you can edit the ones in your tree. For example, if I add pictures or edit details about my parents (who are living) on my tree, it does not add the pictures or change the details on either of their trees. Only I see it. So while in the public tree duplicates are a big problem, between private trees there will be many, many duplicates. I appear in my own tree, my husband’s tree, my mom’s tree, my dad’s tree, each siblings’ tree, etc. each under a different ID–I’m duplicated many times, and this is ok.

To walk you through this process (because I already added my husband’s family to my tree a while ago) I’m on the FamilySearch sandbox. The sandbox is a replica of FamilySearch, but with no real people. You can play around in the sandbox here, but there is also a comprehensive course that will walk you through pretty much anything you want to do on FamilySearch in the sandbox, but without the pressure of messing up your family tree. Also, for your information, you can click on any of these images to see a bigger version.

landscape

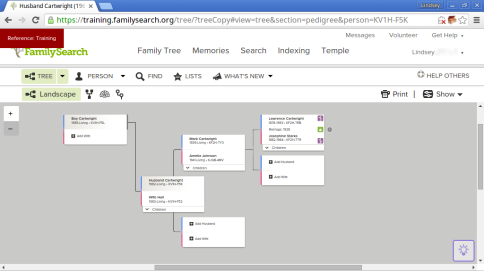
This is what your tree may look like to begin with. If you’re on LDS church records, your spouse and kids will probably already be on your tree. In this case, Husband Cartwright has his family branching off from him, but nobody from his wife’s side of the family is on there. Husband will start by clicking “Add Husband” in the box branching off from Wife Hall.

A search form will pop up, and since Wife Hall’s father (Daddy Hall) is living, Husband Cartwright will select the living option along with any other information he has on Daddy Hall. He’ll then click search, and since there are no duplicates with living people, there will be no results, so Husband will get a window prompting him to “Add New.” And then voila! Daddy Hall now shows up on Wife Hall’s side of the family (in Husband’s tree).

Now we need to add Daddy Hall’s father (Grandpa Hall), who is deceased. Husband will click “Add Husband” in the box branching off from Daddy Hall. There are two ways to add a deceased person, and in this case we’ll do it by ID number. Select “Find by ID Number” in the bottom right corner of the search window, then you’ll have a window asking for the ID number. Husband borrowed Wife’s phone (with the FamilySearch app) and found Grandpa Hall’s ID number on her tree, and Bam! There Grandpa Hall is in the search results. Husband will click the blue “Add Person” button, and now Grandpa Hall is on Husband’s tree, along with Grandpa Hall’s ancestors.

You can also add deceased relatives to your tree by searching. Normally Grandpa Hall’s wife (also deceased) would have automatically been attached, but they aren’t connected on FamilySearch for some reason. Husband Cartwright will click “Add Wife” in the box where Grandpa Hall is and fill out the search form as much as possible. He’s floundering and can only remember her name is Mary, so he’ll click “Search.” At the top of the results is the information Husband entered in about Mary, and if she didn’t exist on FamilySearch yet, he’d click “Create New.” But it’s important to not have duplicates in the deceased, so he’ll scroll through the results first. If he finds her, he’ll click “Add Person.” If he decides to narrow the search down a little (guess a date or place) he can click “Refine Search.”

In summary:  First add your spouse’s living relatives by creating a new (living) person, then you can add the deceased ancestors to those living relatives.

FYI:  It’s best to keep the living people on your tree to a minimum. You can have your living parents, siblings, and in-laws on there, but cousins are a little excessive. Even aunts and uncles aren’t really necessary unless they’re needed to link to someone who has already died. For example, both my aunt and her daughter died when I was young, but since my grandparents are still living, my deceased aunt and cousin weren’t showing up on my tree. I had to search for my aunt to add her to my tree, then I added her (still living) husband so that both parents of my cousin showed up on my tree.

Standard
Possibly Educational

Family History for the Shutterbug

This is a series on finding your niche in doing family history.

There is something about old photos that help us form a meaningful connection to those ancestors we never got to meet. It can also be a special thing to see those we love at a time before we were figuratively “in the picture.”

There are four basic ways we can be contributing to this visual aspect of our family trees:
1. Finding photos
2. Identifying photos
3. Restoring photos
4. Uploading to FamilySearch

Finding Photos

Best case scenario, you’ve got an old family album hanging out in your attic. However, most of us don’t have that ideal situation going on. The originals–in albums, picture frames, or cardboard boxes–are probably going to be living with your parents, grandparents (if still living), aunts and uncles, or great-aunts and uncles. If the photos live with someone not-so-tech-savvy, chances are they haven’t been scanned and uploaded to FamilySearch yet. You can ask around your family (and several sides of your family) to see who has pictures. One side of my family has a Facebook group dedicated to sharing old family photos with everyone.

You can also just be on the lookout for older framed pictures while at relatives’ homes. If at least one of the people in the photo is deceased, you can look them up on your FamilySearch app on your phone right then and there to see if that photo has been added to FS yet.

There are also many sources online where you can find photos of your ancestors. The source I’m always looking for an excuse to use is college or university yearbook digital archives. Many universities have their yearbook archives available to the public, and I’ve found googling “[college or university name] yearbook archives” generally pulls it up easily.

image

I knew my great grandma attended Utah State University (then Utah Agricultural College) when she was young, so I was able to find her in the 1928 Buzzer yearbook as a freshman. I found several clubs she was involved in, and also learned she was the captain (and top scorer) of the freshman women’s basketball team. I zoomed in on her a little, then used a free photo editing program called GIMP to take a screenshot (zooming in was buggy on my phone or tablet, otherwise that would have been simpler). There may be the option to download a pdf of the page, but I found it was usually terrible quality. I cropped the screenshot down, and then it was ready to be uploaded to FS.

deadfred

DeadFred.com is both a bit of a wildcard and an opportunity for service. You can search by surname or geographic area, and you may find an ancestor someone else has posted. Alternately, if you’re looking through your own family pictures and notice non-relatives in a photo (a neighbor or friend, maybe), you can post it on DeadFred to hopefully share the digital copy with that person’s descendents. There are also people who snatch up vintage photos at flea markets and antique shops so they can post these long-lost photos and reunite them with their families. This can be an incredible service to someone who has very few photos of their ancestors.

Lastly, searching family trees on Ancestry.com is another way to find photos, especially of ancestors a couple generations back. And members of the LDS church have free access to this. However, I think it’s good form to message the owner of that family tree before hitting “save image as.” Maybe they’ll even email you the original file.

Identifying Photos

The easiest way to identify people is checking the back of the photo for names, dates, or places. If that information isn’t there, ask other members of your family if they know. You may also use a little detective work to solve the mystery. This site has many articles on how to analyze facial features to identify people. Or you can also pin down a general time frame by looking at the clothing styles of the people in the photo. It can be interesting to take note of your ancestors’ clothing styles even if you know when the photo was taken. It can give great insight into whether great grandma had the means and interest to keep up with current styles, or if she was frugally-minded and wore her (perfectly good) clothes even after the styles had changed.

Restoring Photos

If you’re handy with photo editing, restoring photos damaged by time, mold, creases, rips, or just bad lighting can be a satisfying way to contribute. This is an example of a family photo my sister restored.
image

GIMP is a great option for people not wanting to shell out cash for Photoshop.

Uploading to FamilySearch

This is really the easiest part. If you have a scanner that’s probably the best way too get a high-quality digital copy of the original photo. If you don’t have a scanner, try your local LDS Family History Center or even a public library. You may even be able to get a nice scan using your smartphone camera. Photos can be uploaded via the FamilySearch app or on the desktop version. I prefer uploading photos from the app, but the last time I checked you couldn’t tag photos in the app. They’re continually adding more to the app, though, so that’s a feature that may be available in time. For now, go to the desktop version to tag photos. Tagging photos works pretty much exactly like tagging photos on Facebook, and it’s an important part of the process, especially if it’s a group shot.

memories

A new feature on FamilySearch is the memories tab. In the gallery you can view and organize all the photos, documents, and audio you’ve uploaded to familysearch. You can also upload photos from this page. Under the People heading is a master list of people you’re related to, and you can quickly view photos that pique your interest. In the Find section you can type any name to find pictures and
stories quickly and easily.

Standard
Possibly Educational

Family History for the Young {at Heart}

This is a series on finding your niche in doing family history.

home

One of my favorite hidden gems I’ve found in doing family history research is a little site called AncestorGuru.com. If you’re looking for a kid-friendly, visual way to introduce your family to their ancestors (or if you need to brush up yourself), this is a great source.

login

When you log in, Ancestor Guru pulls pictures and vital dates and places for four generations of your family tree from FamilySearch. You might have some missing pictures or dates, especially when it comes to your living ancestors, and that’s not a big deal. However, these games are more fun when you’ve got four generations complete with photos, dates, and places, so it’s a good incentive to get some pictures uploaded to your family tree. If you aren’t sure how to add pictures to FamilySearch, see Family History for the Shutterbug.

memory

The first game I want to show you is Memory. This is your basic memory matching game, but it uses the pictures from your family tree. This game is perfect for younger kids (no reading required) and it’s a little different every time you play it.

photo

The next game is Fast Photo. This game is easiest on a touch-screen device like an iPad or tablet, but it works fine with a mouse too. When you start the game, photos from your family tree float around the screen along with some non-relatives. Be quick to select great grandma, but avoid Darth Vader and George Washington.

scrambled

Another game is Scrambled Tree. See how quickly you can unscramble your tree. Easy and medium are good for kids, and hard can be a challenge even for adults. You can play this on your own, or you could make this a game for the whole family. Pull up the game on multiple devices and see who is fastest.

lifes

The last game I want to show you is Life’s Journey. This game has a retro video game feel to it. Take note of the selected ancestor’s important dates and places, then you’re ready to go. Bump your balloon into the correct clouds and gather as many coins as possible. Watch out for the birds and wrong clouds on medium and hard because they’ll pop your balloon.

root

A nice feature of Ancestor Guru is that you can change the root person, which is who the games are centered around. You are the default, but if you click in the top right corner you can select your child’s name and it will load ancestors from your spouse’s side of the family, too. If your spouse’s ancestry isn’t showing up, see Family History for the Finisher and I’ll show you how to get that fixed.

Standard
Possibly Educational

How to Make a Canvas

I got a couple of requests to give some details on the canvases I’ve been making. So here we go!

Materials:
•A miter saw (power or by hand)
•Staple gun and staples
•1×2 pine boards (about $1 for 8 ft)
•Canvas or other fabric (Hobby Lobby has lots of cute printed duck for $6/yd with the 40% off coupon, but I’ve also used a plain canvas drop cloth from Home Depot that was about $10 for 9x5ish ft. You could also use just normal cotton fabric)

I start by figuring out what dimensions I want and make 45 degree cuts to those sizes measuring from the long side of the angles, ending up with 2 of each size.

I then put the angles together on a flat surface, double checking the measurements are correct and things line up well (although it’s not a big deal if it’s not perfect).

image

I then take my staple gun and holding the two pieces of a corner close together I put in two staples, straddling the seam. I do this for each corner, then flip (somewhat carefully–it’ll still be a little wobbly) and repeat on the other side. Pine is pretty soft, so the staples usually go in all the way easily. If I hit a knot and it doesn’t go in well, I’ll finish it off with a hammer.

image

Ta daa!

image

For the canvas measure off your frame dimensions plus an extra 4 inches top to bottom and side to side (2 inches extra per side). It’s a pretty big margin of error, so I don’t go to too much trouble making the cuts straight. Set the canvas down on a flat surface (wrong side up for printed fabrics) and center the frame on the canvas.

image

Pull one edge of the fabric over the frame and put a staple in the middle. Pull the opposite edge tight (although be careful it doesn’t tear) over the frame and staple in the middle. Repeat with the other two sides. (P.S. my canvas happened to be a little short on the short sides–I’d cut it for something else–which is a little trickier to stretch, but doable)

image

Go back to the first side and pull tight putting one staple on each side of the first staple a couple inches away (I don’t measure exactly). Repeat on the opposite side, and then again on the other two sides. And then continue in that manner until you get to the edges. (Follow the numbers in the picture if that doesn’t make sense)

image

Finishing off the corners is pretty simple, but hard to explain. Just be sure to decide beforehand if you want the folds on the top and bottom or the sides. I think I prefer top and bottom, but it doesn’t matter very much. Here’s an illustration:

image

image

That’s it! The stretching should get rid of most of the creases, but if not I turn it right side down and go over it with an iron. If it’s printed fabric it’s ready to hang. If it’s plain and you’re going to paint over it with acrylic paint, a coat of primer (or even normal latex paint) is helpful because the fabric soaks acrylic right up. If you’re gluing pictures on, it sticks fine without priming first (I use a craft tacky glue).

image

I don’t put pictures of my child on the blog (hence the sticker over his face), but I wanted to show some different ways I’ve done picture canvases.

Standard
Possibly Educational

How to Talk to Kids about Sexual Abuse

A friend messaged me earlier this week because her sister-in-law was wondering about how to talk to her 7-year-old daughter about body safety.  I rounded up a couple handouts I had stowed away, and as I looked through I realized they were missing some important parts.  I’ve been wanting to jot down some of the main points of Good-Touch/Bad-Touch before I forgot it anyway, so this gave me a good excuse to do a brain dump on what I used to teach on a daily basis. 

All these concepts come from the Good-Touch/Bad-Touch curriculum (by Pam Church).  Childhelp has since phased out GTBT and replaced it with a similar program called Speak Up Be Safe.  If your kids have the opportunity to participate in either of these programs I highly recommend it.  However, if that’s not an option in your area, here are some talking points in kid-friendly language so you can feel more comfortable discussing it with your kids.

A few things for parents to keep in mind:

  • Kids don’t have the same emotional response to sexual abuse that adults do.  They simply don’t know enough about the logistics of intimacy to have that spine-crawling reaction adults get when talking about sexual abuse.  When kids learn about sexual abuse, they put in on about the same level as stepping in dog poop, which is where it should be.  Kids should think sexual abuse is gross and something to be avoided, but nothing to be scared about.
  • When talking about sexual abuse, tone is everything.  If there’s a scared or nervous tone to your voice, you bet your kids are going to pick up on that.  And that’ll make them scared about it too.  Keep your voice (and face) conversational and calm—as if you were talking to your kids about first aid or fire safety.
  • Parents may worry about preserving their child’s innocence.  However, when it comes to safety, innocence is not the thing to shoot for.  Kids need to know that sexual abuse is wrong, and what to do if they have a problem with it.  Innocence on this matter does them no favors.
  • Don’t feel like you have to make talking about sexual abuse this huge, all or nothing conversation.  Take it bit by bit and slip these concepts into normal conversation with your kids over time.  Do what you’re comfortable with.  Remember, if you’re uncomfortable, your kids will be too.
  • These concepts and terms are geared toward 5-7 year olds (which is a good time to start talking about sexual abuse), but you can adapt the same ideas to be appropriate for kids older than that.

Terminology

Sexual Abuse: When someone tries to force or trick a child so they can touch a child’s private body parts. Or, when someone tries to force or trick a child into touching the private parts of another person’s body.

Force: When someone makes you do something you don’t want to do or don’t understand.

Trick: When someone fools you, lies to you, pretends, calls something a game that really isn’t a game, or tells jokes that really aren’t funny. A trick makes you feel sad or angry.

Private Body Parts: The parts of your body that are covered by a swimming suit. It’s the parts between your legs in the front and back, and also your chest.

Good Touches: Touches that feel good on your body and make you feel happy and safe. Good touches make you feel like smiling.

Bad Touches: Touches that hurt our bodies, like hitting, kicking, or scratching.

Confusing Touches: Forced or tricked touch of private body parts—sexual abuse. These touches are confusing because sometimes they feel soft like a good touch and sometimes they hurt like a bad touch, but confusing touches always make you feel sad or scared.

Safety Rules

  1. It’s my body! I decide who I want to share my body with and how I want to share it.
  2. Listen to the Uh-Oh Feeling! If I feel like something is wrong, I’m always right. Sometimes I need to ask questions.
  3. Say NO and get away! I have the right to say no and get away if anyone tries to hurt me or sexually abuse me.
  4. Tell someone! If someone tries to hurt me, I will tell an adult I trust. If that person doesn’t believe me, I will keep telling until someone believes me.
  5. It’s NEVER my fault! No matter what, if I am sexually abused, it is never my fault.

Other Important Concepts

I am Special: Being special means that there is nobody else in the entire world exactly like me. Being special also means that a lot of people care about me and want me to stay safe. It’s important to remember that I only have one body, so I need to take very good care of it.

Good Force vs. Bad Force: Sometimes parents make you do things you don’t like, but are good for you—like cleaning your room, eating vegetables, or going to bed. This kind of force is good force because it doesn’t hurt you. When someone makes you do something that makes you feel yucky, sad, or scared, this is a bad kind of force. If you don’t know if something is good or bad force, talk to an adult you trust about it.

An Example of a Trick: Pretend your brother or sister tells you they’ll give you your favorite candy bar if you clean their room for them. So you clean their room, then you go to your brother or sister to get the candy bar. They say, “Oh, I’m not really going to give you a candy bar. I just wanted you to clean my room.” This is a mean trick.

What is the Uh-Oh Feeling? The Uh-Oh Feeling is a little friend that lives in your tummy. It lets you know if something is wrong or if you need to be careful. You can feel the Uh-Oh Feeling for a lot of different reasons. You might feel it if you can’t find your mom at the store. Or you might feel it if you broke someone else’s toy. But most importantly, the Uh-Oh Feeling will let you know if something is a confusing touch. If you feel the Uh-Oh Feeling, it means it’s time to talk to an adult you trust and ask questions.

On Promises: Most promises are good, but if someone asks you to promise to do something that makes you feel the Uh-Oh Feeling, that sounds like a bad sort of promise. Talk to an adult you trust if a promise doesn’t make you feel good.

Bad Secrets vs. Surprises: Surprises are fun for everyone, and nobody’s feelings get hurt. With surprises you keep something a secret for a little while and then make someone happy by surprising them with the secret. Bad secrets are different. They are not fun for anyone and will make you feel the Uh-Oh Feeling. If something is supposed to be a secret forever, that’s another clue that it’s a bad secret. If someone asks you to keep a bad secret always tell an adult you trust.

On Disobeying Grown-Ups: Most grown-ups are good people that want you to be safe, and most of the time it’s a good idea to obey grown-ups. But if a grown up tries to sexually abuse you, it’s ok to say no to that grown-up. If a grown-up asks you to keep a bad secret or make a promise that makes you feel yucky, it’s ok to tell a different grown-up you trust about it.

Who Sexually Abuses Kids? Someone who sexually abuses kids can look like anybody. It can look like either a boy or a girl. It can look like an adult or another kid. They can look mean, or they could look nice. It can be a stranger or someone you know. Most of the time kids are sexually abused by someone they know. It isn’t ok for anyone to sexually abuse you, even if it’s someone you know or like.

Discriminating Between Helping and Hurting: There are times when adults may look at or touch a kid’s private body parts, but it’s not sexual abuse. When a baby needs a diaper change, this is not sexual abuse. It’s not tricking or forcing—it’s helping. Sometimes moms, dads, doctors, or nurses need to look at or touch private body parts when a kid is hurt or sick. This isn’t sexual abuse either, because they aren’t forcing or tricking. They are helping. But if someone says something like, “Let’s play a game where we pretend I’m a doctor and I look at your private body parts,” this is a trick, because looking at or touching private body parts is never a game.

Standard