This is a series on finding your niche in doing family history.
There is something about old photos that help us form a meaningful connection to those ancestors we never got to meet. It can also be a special thing to see those we love at a time before we were figuratively “in the picture.”
There are four basic ways we can be contributing to this visual aspect of our family trees:
1. Finding photos
2. Identifying photos
3. Restoring photos
4. Uploading to FamilySearch
Finding Photos
Best case scenario, you’ve got an old family album hanging out in your attic. However, most of us don’t have that ideal situation going on. The originals–in albums, picture frames, or cardboard boxes–are probably going to be living with your parents, grandparents (if still living), aunts and uncles, or great-aunts and uncles. If the photos live with someone not-so-tech-savvy, chances are they haven’t been scanned and uploaded to FamilySearch yet. You can ask around your family (and several sides of your family) to see who has pictures. One side of my family has a Facebook group dedicated to sharing old family photos with everyone.
You can also just be on the lookout for older framed pictures while at relatives’ homes. If at least one of the people in the photo is deceased, you can look them up on your FamilySearch app on your phone right then and there to see if that photo has been added to FS yet.
There are also many sources online where you can find photos of your ancestors. The source I’m always looking for an excuse to use is college or university yearbook digital archives. Many universities have their yearbook archives available to the public, and I’ve found googling “[college or university name] yearbook archives” generally pulls it up easily.
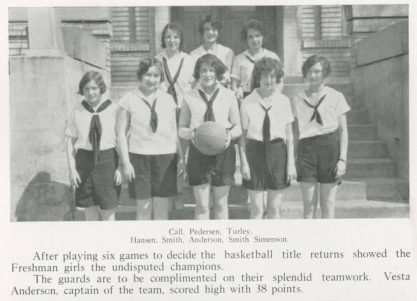
I knew my great grandma attended Utah State University (then Utah Agricultural College) when she was young, so I was able to find her in the 1928 Buzzer yearbook as a freshman. I found several clubs she was involved in, and also learned she was the captain (and top scorer) of the freshman women’s basketball team. I zoomed in on her a little, then used a free photo editing program called GIMP to take a screenshot (zooming in was buggy on my phone or tablet, otherwise that would have been simpler). There may be the option to download a pdf of the page, but I found it was usually terrible quality. I cropped the screenshot down, and then it was ready to be uploaded to FS.
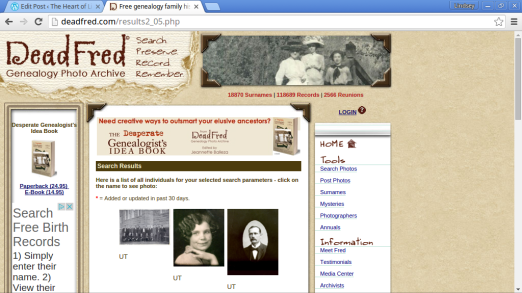
DeadFred.com is both a bit of a wildcard and an opportunity for service. You can search by surname or geographic area, and you may find an ancestor someone else has posted. Alternately, if you’re looking through your own family pictures and notice non-relatives in a photo (a neighbor or friend, maybe), you can post it on DeadFred to hopefully share the digital copy with that person’s descendents. There are also people who snatch up vintage photos at flea markets and antique shops so they can post these long-lost photos and reunite them with their families. This can be an incredible service to someone who has very few photos of their ancestors.
Lastly, searching family trees on Ancestry.com is another way to find photos, especially of ancestors a couple generations back. And members of the LDS church have free access to this. However, I think it’s good form to message the owner of that family tree before hitting “save image as.” Maybe they’ll even email you the original file.
Identifying Photos
The easiest way to identify people is checking the back of the photo for names, dates, or places. If that information isn’t there, ask other members of your family if they know. You may also use a little detective work to solve the mystery. This site has many articles on how to analyze facial features to identify people. Or you can also pin down a general time frame by looking at the clothing styles of the people in the photo. It can be interesting to take note of your ancestors’ clothing styles even if you know when the photo was taken. It can give great insight into whether great grandma had the means and interest to keep up with current styles, or if she was frugally-minded and wore her (perfectly good) clothes even after the styles had changed.
Restoring Photos
If you’re handy with photo editing, restoring photos damaged by time, mold, creases, rips, or just bad lighting can be a satisfying way to contribute. This is an example of a family photo my sister restored.

GIMP is a great option for people not wanting to shell out cash for Photoshop.
Uploading to FamilySearch
This is really the easiest part. If you have a scanner that’s probably the best way too get a high-quality digital copy of the original photo. If you don’t have a scanner, try your local LDS Family History Center or even a public library. You may even be able to get a nice scan using your smartphone camera. Photos can be uploaded via the FamilySearch app or on the desktop version. I prefer uploading photos from the app, but the last time I checked you couldn’t tag photos in the app. They’re continually adding more to the app, though, so that’s a feature that may be available in time. For now, go to the desktop version to tag photos. Tagging photos works pretty much exactly like tagging photos on Facebook, and it’s an important part of the process, especially if it’s a group shot.
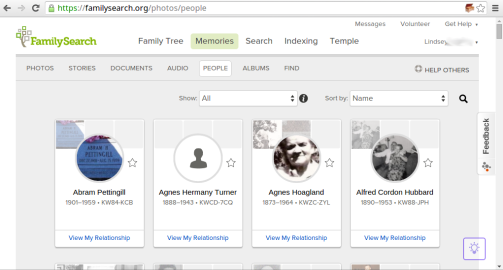
A new feature on FamilySearch is the memories tab. In the gallery you can view and organize all the photos, documents, and audio you’ve uploaded to familysearch. You can also upload photos from this page. Under the People heading is a master list of people you’re related to, and you can quickly view photos that pique your interest. In the Find section you can type any name to find pictures and
stories quickly and easily.